練習 としてCreating your first node を動かすことができました。次はもう少し実際の利用にあわせてInfluxDBにメッセージを保存するnodeを書いてみます。node-red-nodes のstorageディレクトリにデータベース用のnodeがいくつかあります。今回はPostgreSQLの110-postgres.js を参考にします。
Cannot find module ‘influx’ 前回 settings.jsに追加のnodesディレクトリを設定しました。コンテナを起動するときにDockerホストのディレクトリをマウントするようにしています。
~/docker_apps/nod-red/settings.js ... nodesDir: '/data/nodes' , ...
最初はこの追加ディレクトリにInfluxDBのnodeを配置しましたが、require("influx");のところでモジュールの読み込みに失敗してしまいます。InfluxDBクライアント はNode-REDのpackage.jsonの最後に追加しました。google/nodejs-runtime のDockerfileではONBUILD RUN npm installでnpmモジュールをインストールしています。
package.json "dependencies": { "express": "3.17.2", "when": "3.7.2", ... "influx":"3.3.0" },
作成したnodeをnpmパッケージとして公開する方法がPackaging にあります。まだ開発中なのでNode-REDをcloneしたディレクトリにあるnodes/core/storage/配下に直接追加してDockerイメージを再作成することにします。npmに登録するのはテストが通ってからにします。
InfluxDBのnode ファイル名の数字のprefixはnodesディレクトリ内でnodeのロード順を定義するようです。とりあえず98にしました。jsファイルにnodeのロジックを記述します。
~/docker_apps/node-red/nodes/core/storage/98-influxdb.js module .exports = function (RED ) "use strict" ; var influx = require ("influx" ); function InfluxDBNode (n ) RED.nodes.createNode(this ,n); this .host = n.host; this .port = n.port; this .db = n.db; this .user = this .credentials.user; this .password = this .credentials.password; } RED.nodes.registerType("influxdb" ,InfluxDBNode,{ credentials: { user: {type :"text" }, password: {type : "password" } } }); function InfluxNode (n ) RED.nodes.createNode(this ,n); this .influxdb = n.influxdb; this .influxConfig = RED.nodes.getNode(this .influxdb); var node = this ; if (this .influxConfig) { node.clientdb = influx({ host : this .influxConfig.host, port : this .influxConfig.port, username : this .influxConfig.user, password : this .influxConfig.password, database : this .influxConfig.db }); node.on("input" , function (msg ) node.clientdb.writePoint(msg.topic, JSON .parse(msg.payload), function (err ) if (err) { node.error(err); } }); }); } } RED.nodes.registerType("influx" ,InfluxNode); }
htmlファイルにはnodeの設定を記述します。ユーザーが値を入力するフォームのテンプレートとNode-REDへの登録を行います。今回は最初なのでcategoryはconfigとsotrage-outだけ作成してレコードを登録する機能だけ実装します。
~/docker_apps/node-red/nodes/core/storage/98-influxdb.html <script type ="text/x-red" data-template-name ="influxdb" > <div class "form-row" > <label for ="node-config-input-host" > <i class ="fa fa-bookmark" > </i > Host</label > <input class "input-append-left" type="text" id="node-config-input-host" placeholder="localhost" style="width: 40%;" > <label for ="node-config-input-port" style ="margin-left: 10px; width: 35px; " > Port</label > <input type ="text" id ="node-config-input-port" placeholder ="8086" style ="width:45px" > </div > <div class "form-row" > <label for ="node-config-input-db" > <i class ="fa fa-briefcase" > </i > Database</label > <input type ="text" id ="node-config-input-db" placeholder ="" > </div > <div class "form-row" > <label for ="node-config-input-name" > <i class ="fa fa-user" > </i > Username</label > <input type ="text" id ="node-config-input-user" placeholder ="username" > <label for ="node-config-input-password" > <i class ="fa fa-lock" > </i > Password</label > <input type ="password" id ="node-config-input-password" placeholder ="password" > </div > </script > <script type ="text/javascript" > RED.nodes.registerType('influxdb' ,{ category: 'config' , defaults: { host: { value :"localhost" ,required :true }, port: { value : 8086 ,required :true }, db: { value :"influxdb" ,required :true } }, credentials: { user: {type :"text" }, password: {type : "password" } }, label: function ( return this .db; } }); </script > <script type ="text/x-red" data-template-name ="influx" > <div class "form-row" > <label for ="node-input-name" > <i class ="fa fa-tag" > </i > Name</label > <input type ="text" id ="node-input-name" placeholder ="Name" > </div > <div class "form-row" > <label for ="node-input-influxdb" > <i class ="fa fa-tag" > </i > Server</label > <input type ="text" id ="node-input-influxdb" > </div > </script > <script type ="text/x-red" data-help-name ="influx" > <p > A InfluxDB I/O node. </p > </script > <script type ="text/javascript" > RED.nodes.registerType("influx" ,{ category: "storage-output" , color:"#dbb84d" , defaults: { influxdb: {type :"influxdb" ,required :true }, name: {value :"" } }, inputs: 1, outputs: 0, icon: "influxdb.png" , align: "right" , label: function ( var influxDBNode = RED.nodes.node(this .influxdb); return this .name||(influxDBNode?influxDBNode.label():"influxdb" ); }, labelStyle: function ( return this .name?"node_label_italic" :"" ; } }); </script >
最後にInfluxDBのアイコンを用意します。
~/docker_apps/node-red/public/icons/influxdb.png
Dockerイメージの作成と起動 Dockerイメージのビルドとコンテナを起動します。
$ cd ~/docker_apps/node-red/
$ docker build -t node-red .
$ docker run -d  --name node-red \
  -p 1880:1880 \
  -v /opt/nodes:/data/nodes \
  node-red
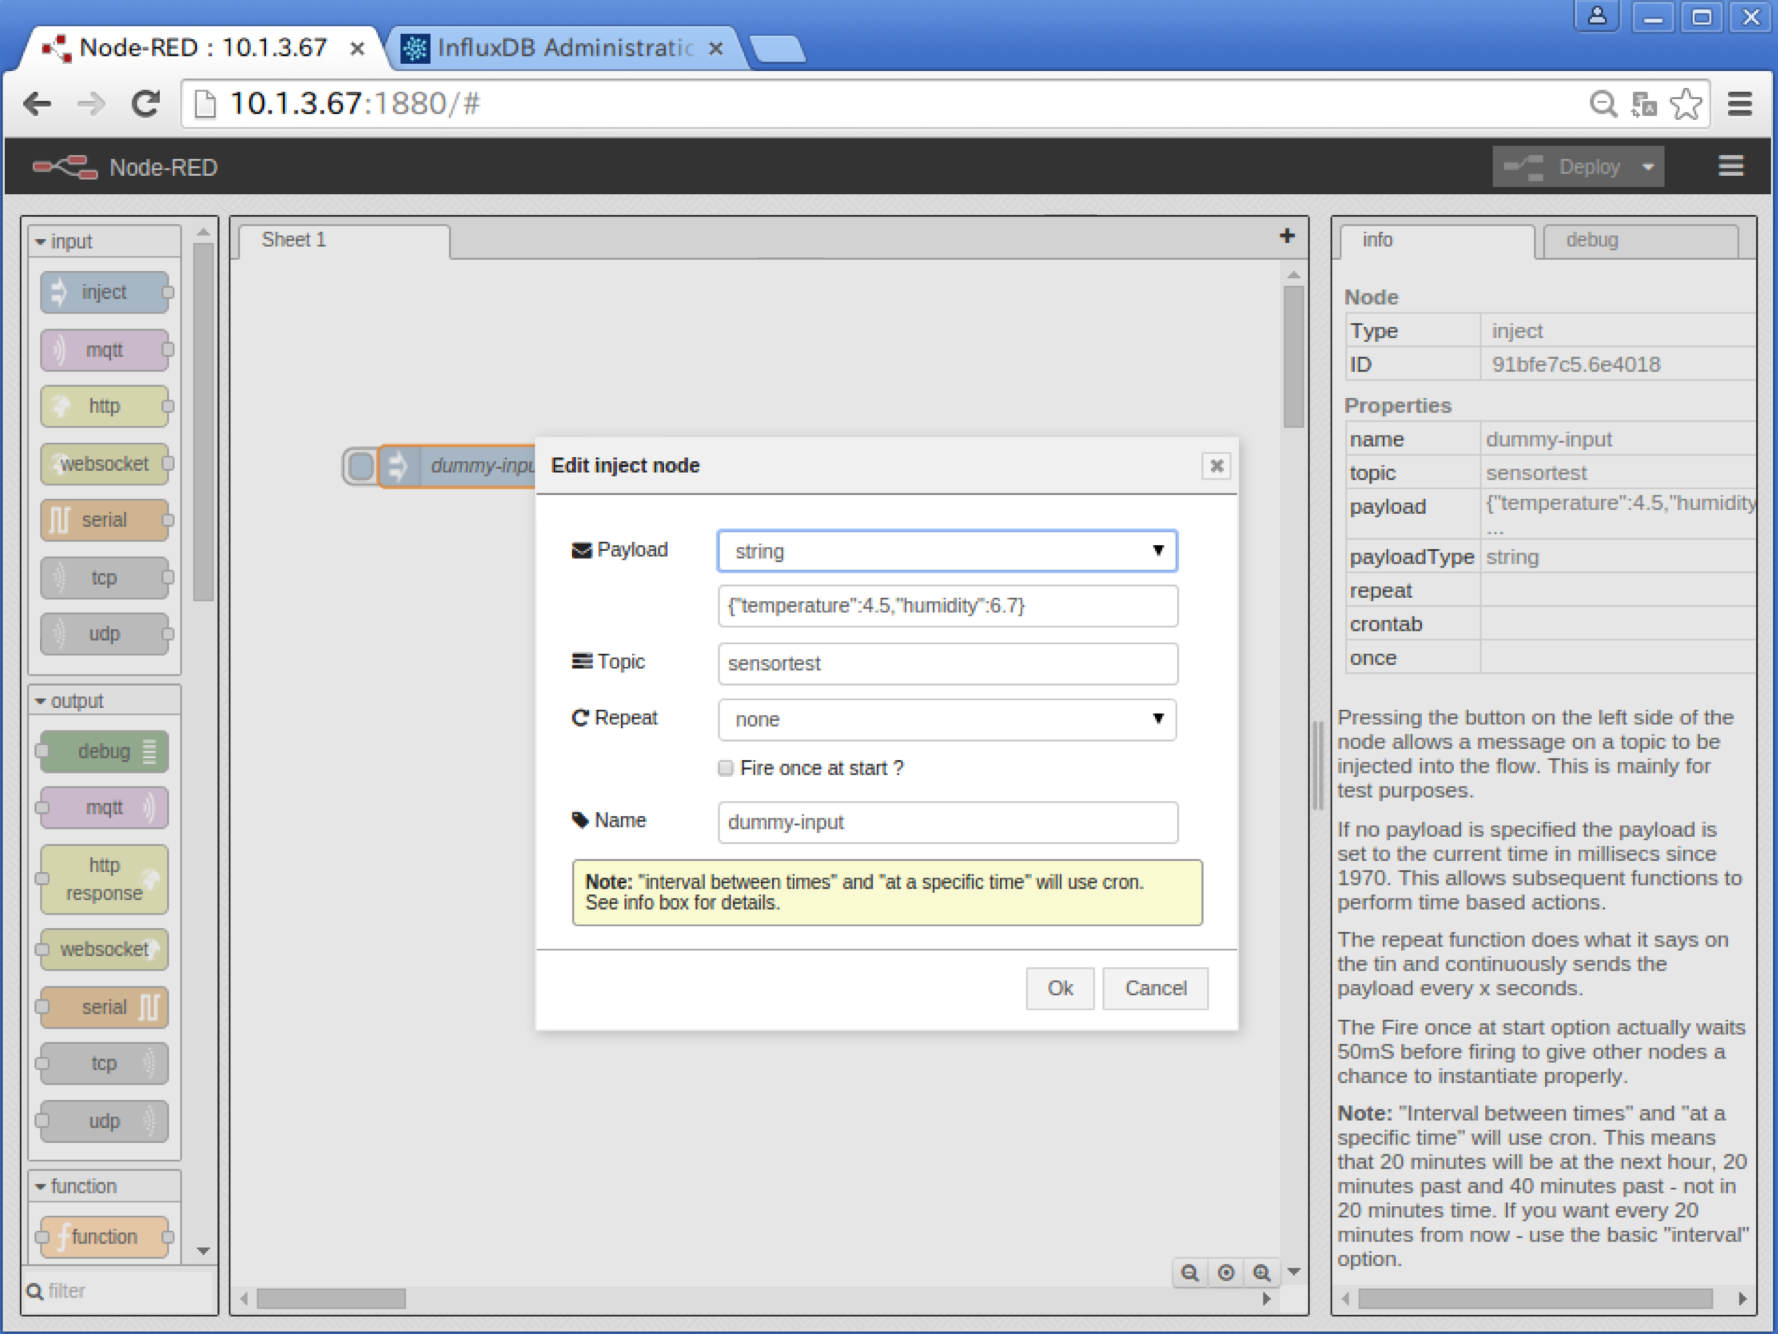
Node-REDでflowの作成 inject nodeをworkspaceにドラッグ&ドロップします。テスト用にPayloadにInfluxDBに保存するJSONを文字列で書きます。キーはダブルクォートで囲います。TopicはInfluxDBのseries名になります。
Payload: string {“temperature”:4.5,”humidity”:6.7}
Topic: sensortest
Repeat: None
Name: dummy-input
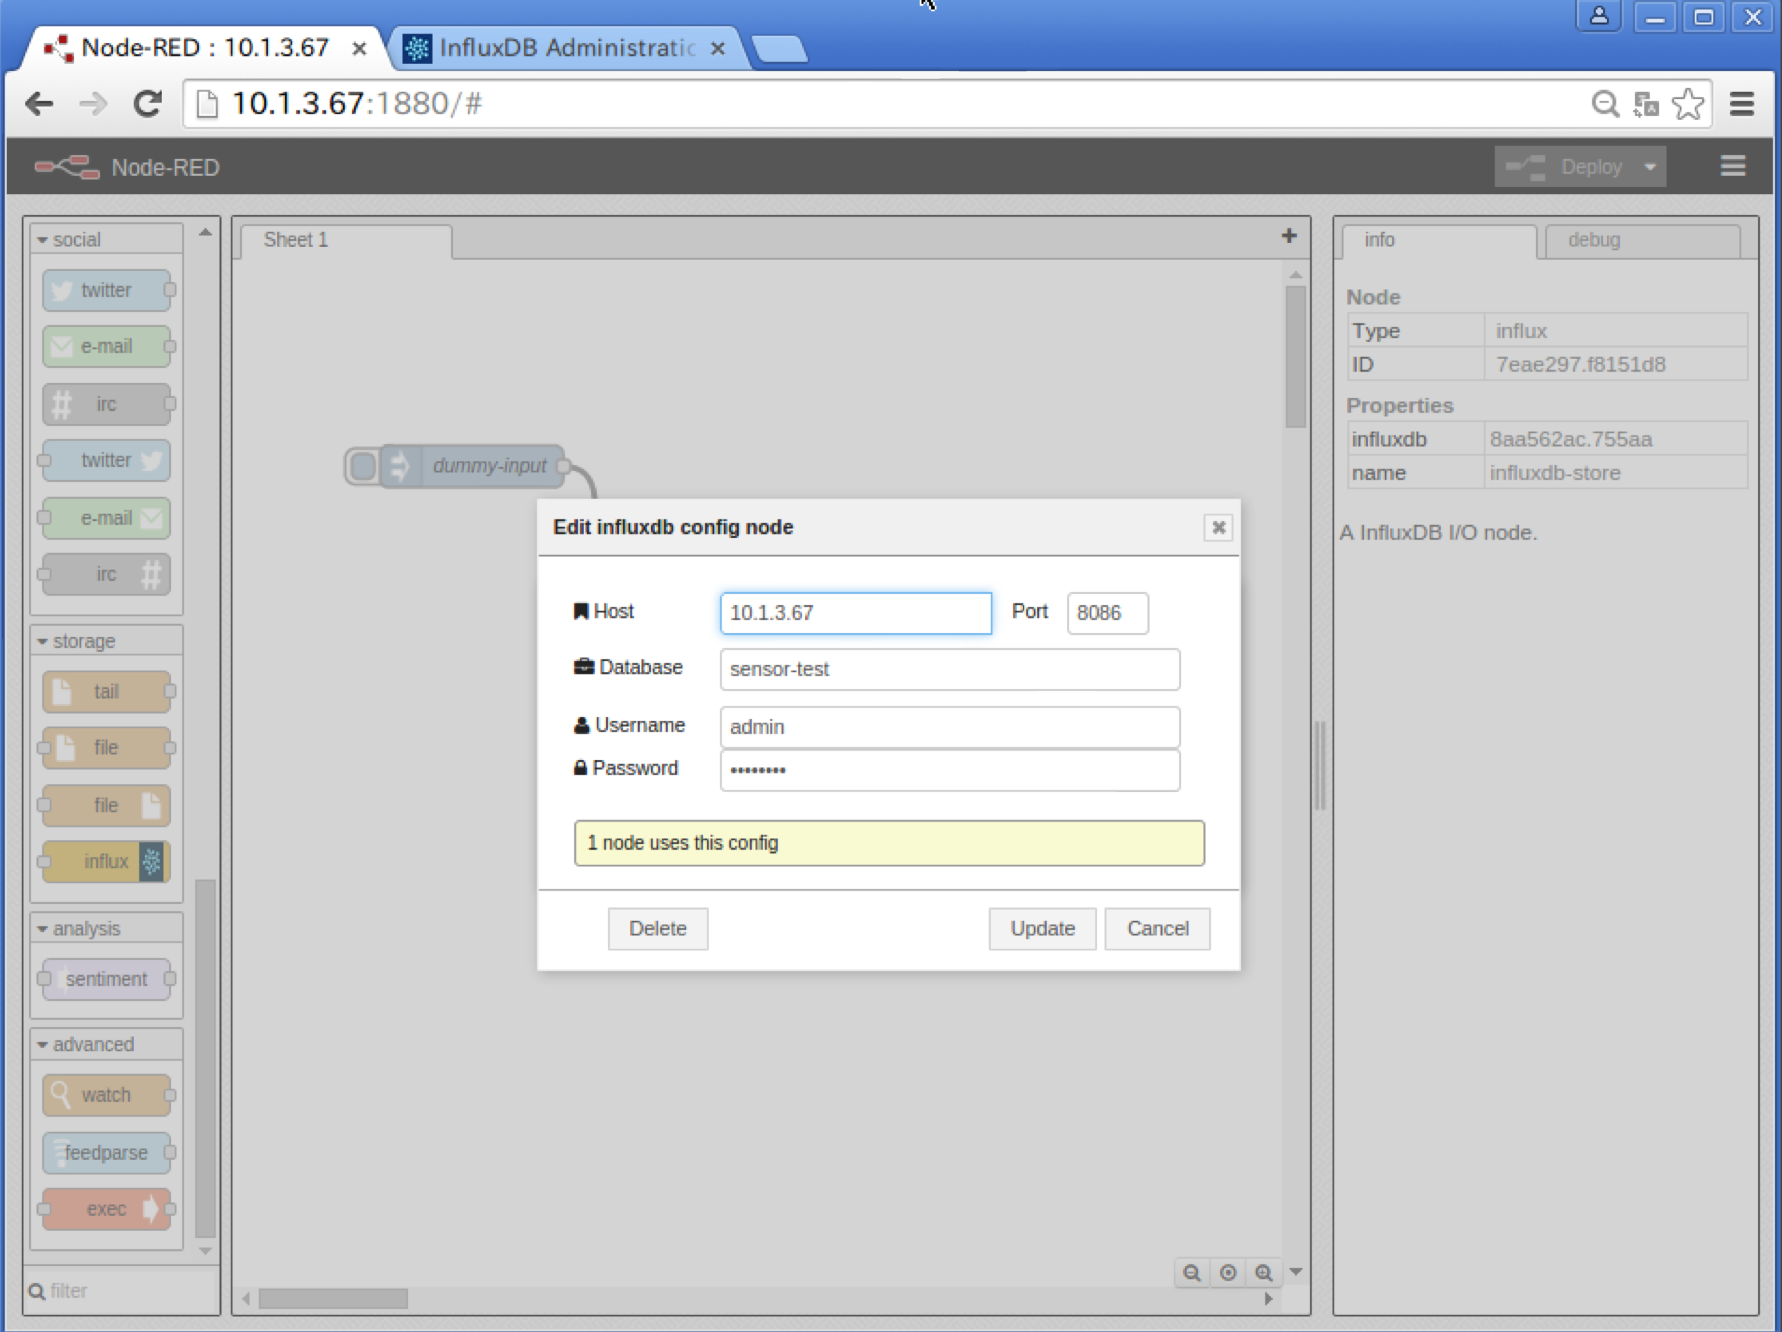
storage:influx storageカテゴリからinfluxをworkspaceにドラッグ&ドロップします。nodeのconfigに接続するInfluxDBのHost名やDatabase名を設定します。
node
Name: influxdb-store
Server: sensor-test
config
Host: 10.1.3.67
Port: 8086
Database: sensor-test
User: admin
Password: password
デプロイと実行 InfluxDBにテスト用のDatabaseとユーザーを作成します。
$ curl -X POST 'http://10.1.3.67:8086/db?u=root&p=root' -d '{"name": "sensor-test"}'
$ curl -X POST 'http://10.1.3.67:8086/db/sensor-test/users?u=root&p=root' \
  -d '{"name": "admin", "password": "password"}'
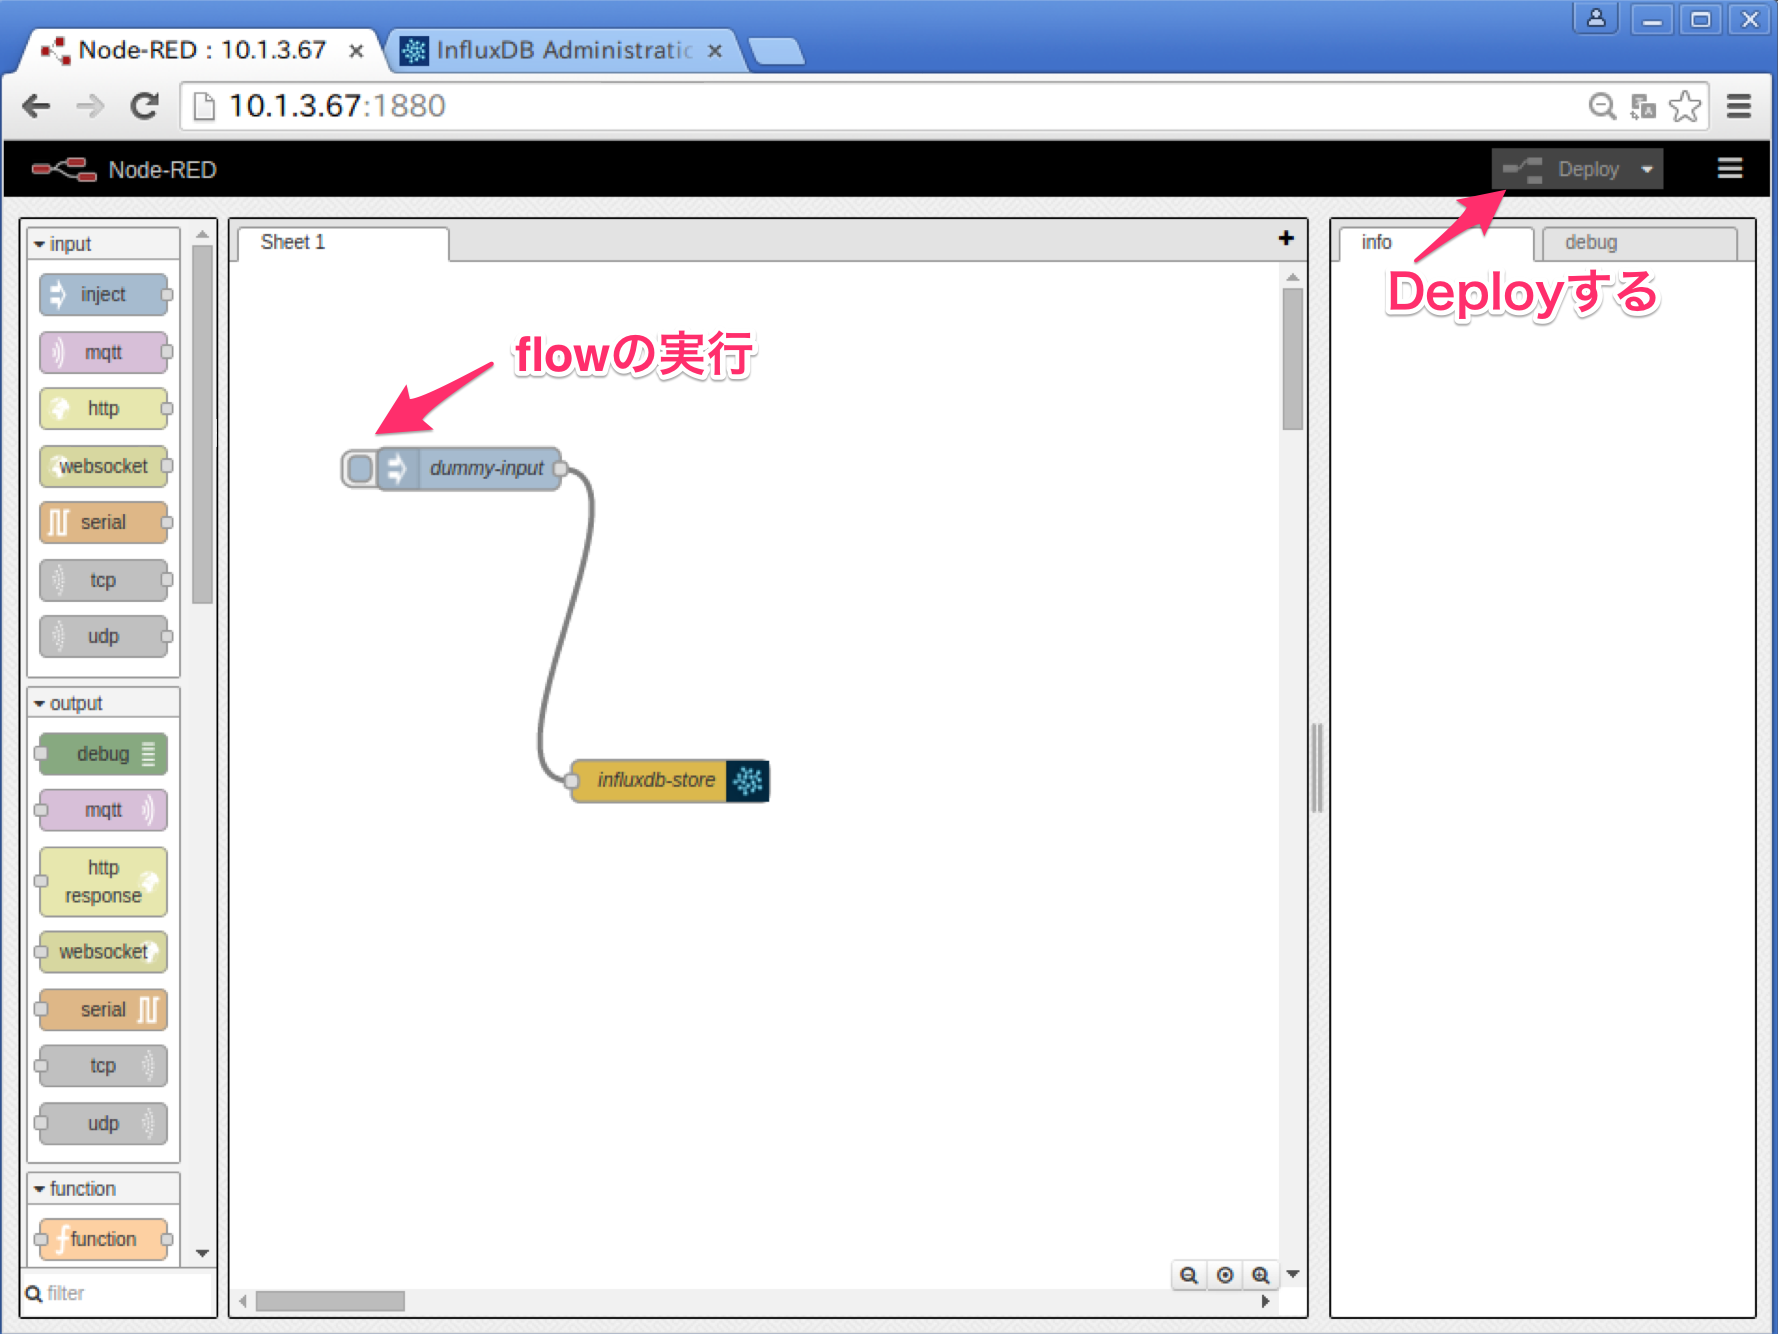
画面右上のDeployボタンを押してデプロイします。テストなのでflowの起動はinject nodeの左側のボタンをクリックします。
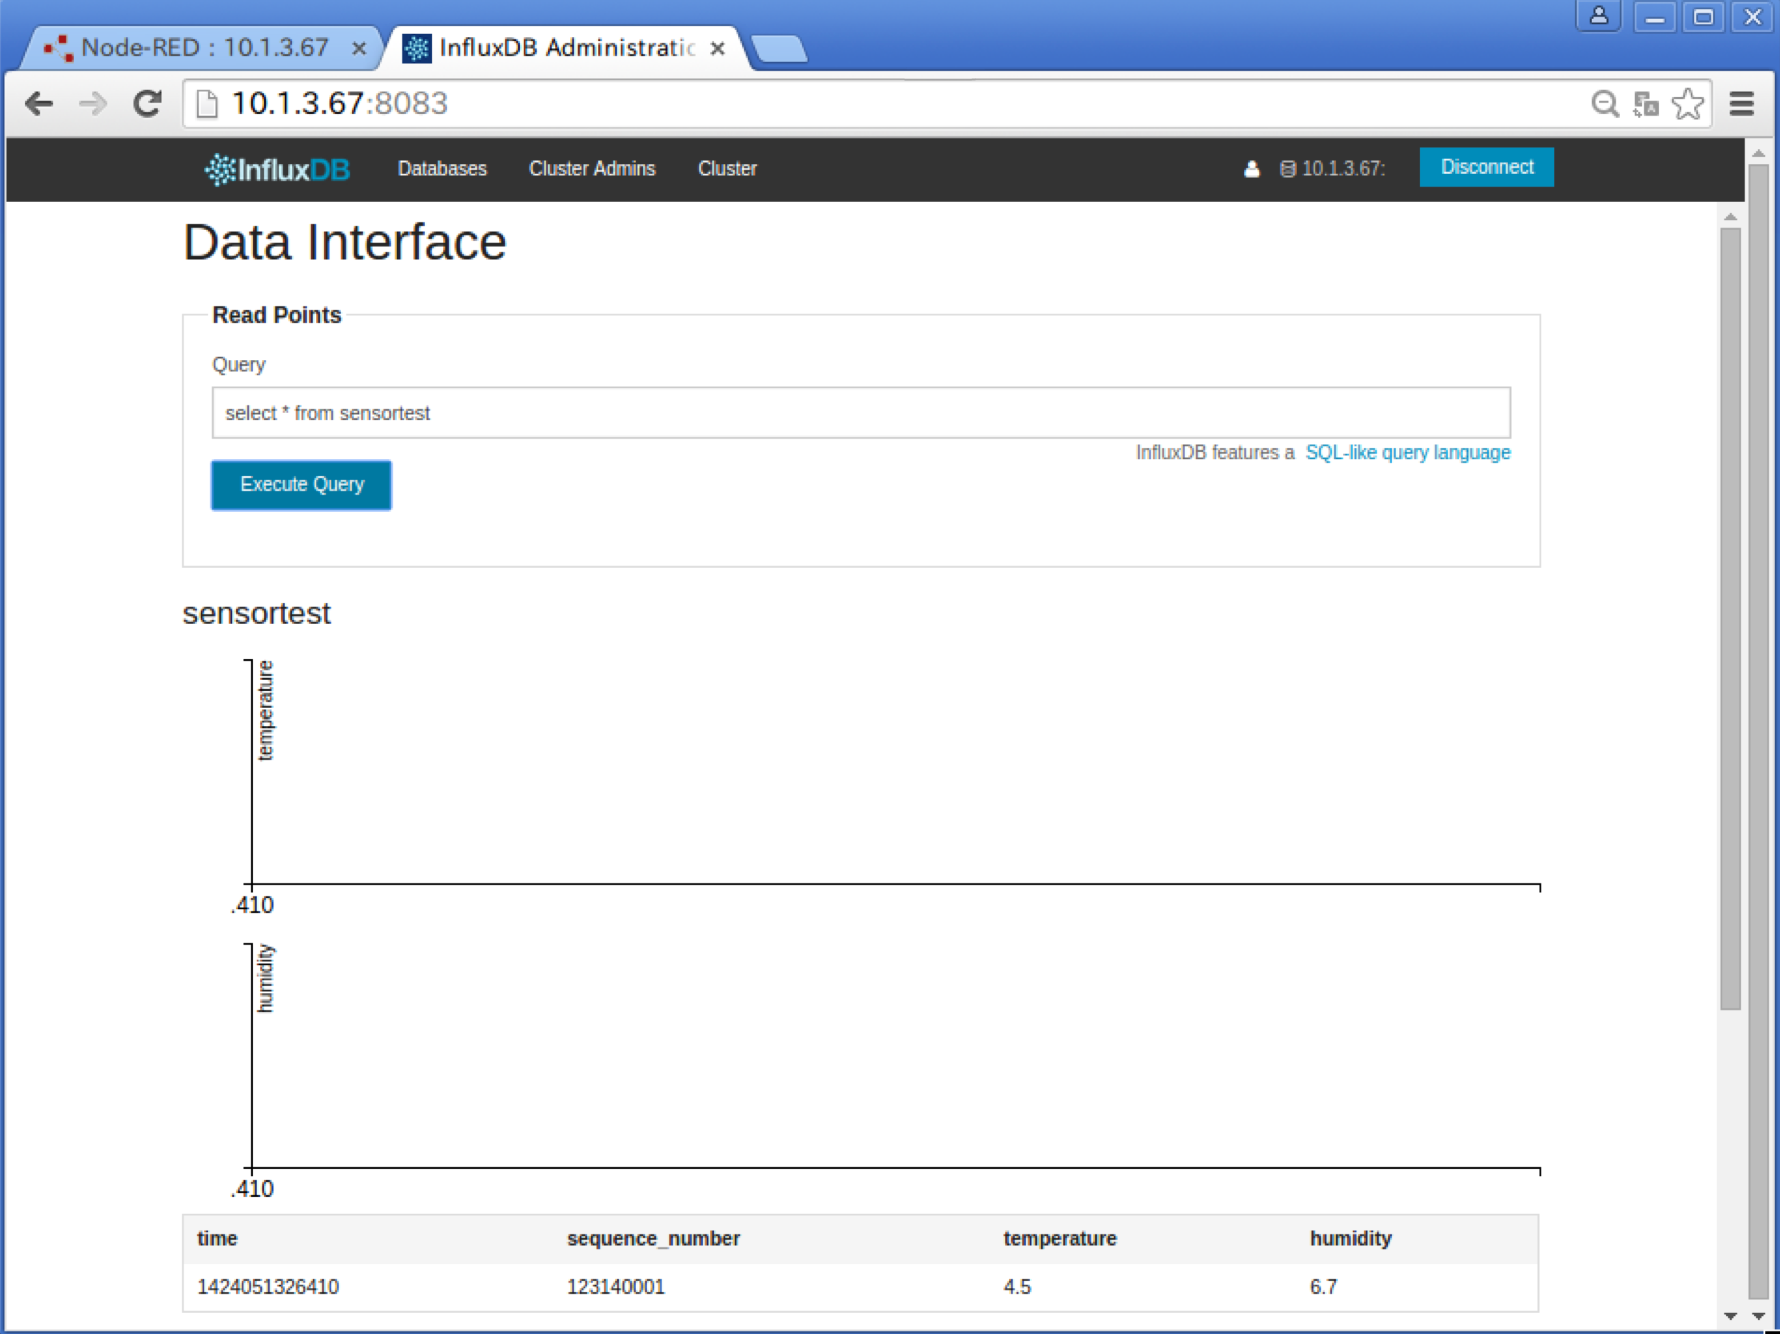
InfluxDBの管理画面 sensor-testデータベースのクエリ画面を開きます。
Databases > sensor-test > Explore Data
以下のような簡単なQueryを記述してExecute Queryボタンを押すと1レコードヒットしました。Node-REDのinject nodeに定義したPayloadがInfluxDBに保存できたようです。